本文最后更新于:2026-01-29T10:45:37+08:00
SMPL系列模型
原理介绍
SMPL (Skinned Multi-Person
Linear
Model)是一种裸体的,基于顶点的人体Mesh模型,它能够精确的表示人体的不同形状和姿态。
SMPL模型首先提供了一个平均模版作为初始化的人体mesh,然后通过不同的参数\(\beta,
\theta\) 对这个模板进行调整,以适应不同形状和姿态:
形状参数\(\beta \in
\mathbb{R}^{10}\) :控制人体的高矮胖瘦,每个标量值都可以解释为人体沿某个方向的膨胀或者收缩量
姿势参数\(\theta \in \mathbb{R}^{24 \times
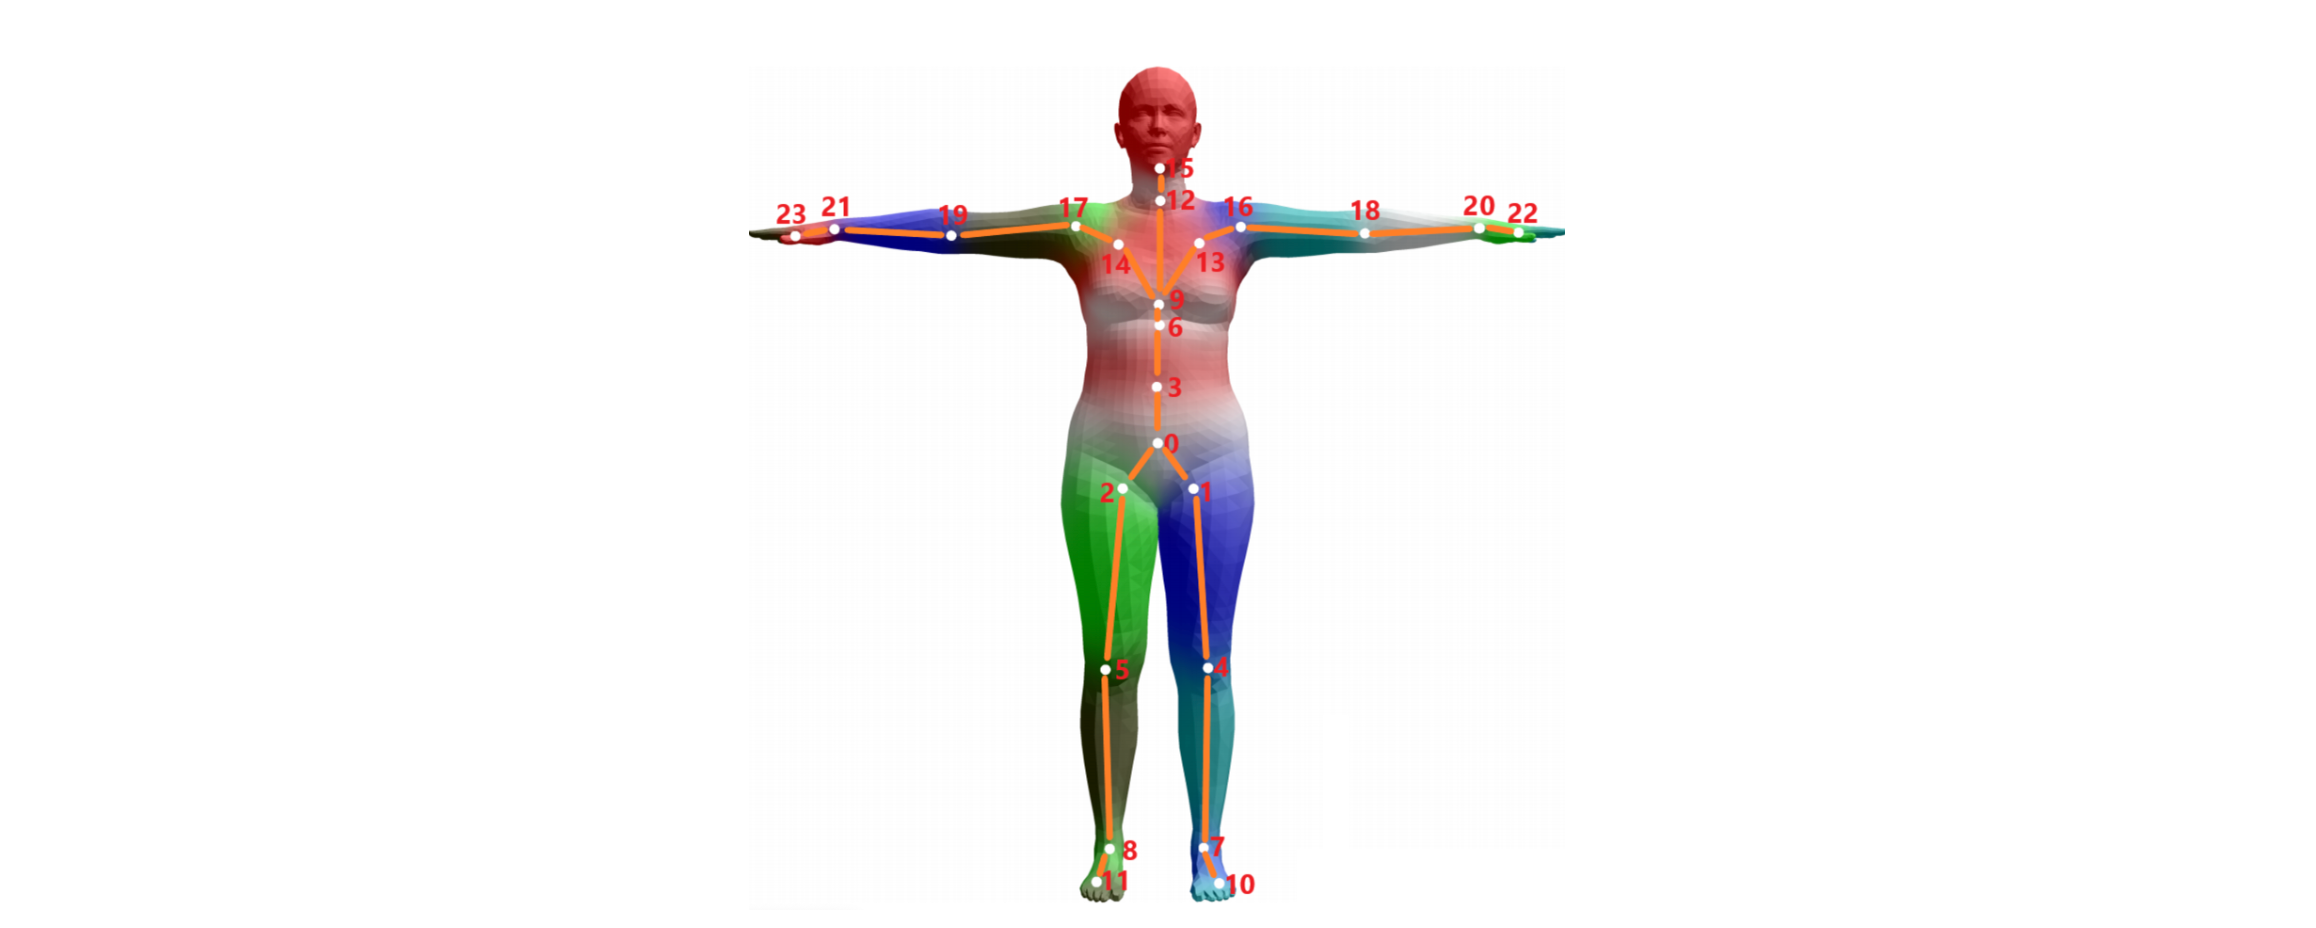
3}\) :控制人体的动作姿态,其中24对应提前定义好的人体关节点,3则表示该节点相对于其父节点旋转角度的轴角表达式(Axis–angle
representation)
轴角表达式:记录了旋转轴以及旋转角度信息,一般来说是四元组,分别表示旋转轴和旋转角度,这里使用的是三元数表示。\(\theta =
(x,y,z)\) ,旋转轴是其对应的单位向量\(\frac{\theta}{||\theta||}\) ,旋转大小是\(||\theta||\)
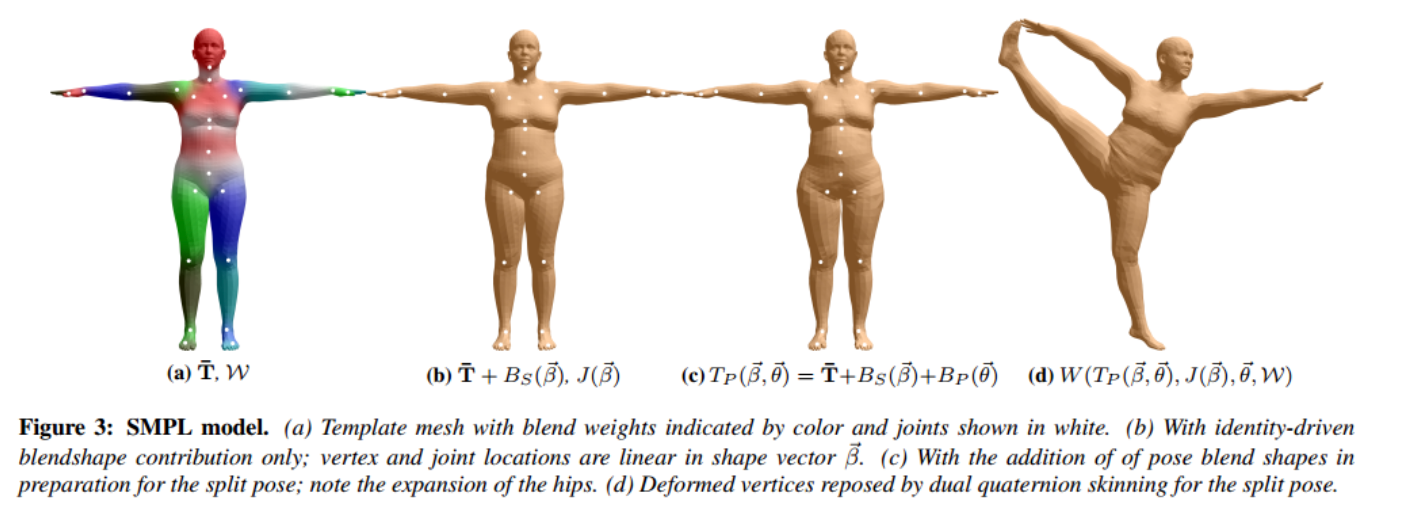
SMPL模型中的基础模版记做\(\bar{T}\in\mathbb{R}^{3N}\) ,其中包含包含\(N=6890\) 个顶点,\(13776\) 个面片和\(K=24\) 个关节点。我们接下来考虑的就是如何从该模版出发,利用形状参数和姿态参数进行不同形状和姿态的转换。整个流程包括如下阶段:
在此之前,我们还需要引入一些相关参数,这些参数都是SMPL团队在大量数据上学习得到的:
首先是\(S\in\mathbb{R}^{3N\times10}\) 和\(P\in \mathbb{R}^{3N\times
9K}\) ,他们分别表示形状参数和姿态参数分别是如何影响整个人体Mesh的;
然后是\(\mathcal{W} \in
\mathbb{R}^{N\times
K}\) ,这是LBS/QBS混合权重矩阵,它表示的是关节点对其余顶点的影响权重,一般来说,离关节点越近的顶点,受该顶点的影响越大;
然后是\(J\in\mathbb{R}^{3N\times3K}\) ,它是一个回归矩阵,表示如何在Rest
Pose下根据Mesh顶点计算出K个关节点的位置
初始模版对应人体Mesh的姿态称为Rest
Pose(静默姿态,也可以称为T-Pose,或者标准姿态,canonical pose)
首先我们需要对人体Mesh进行形状调整 :给定形状参数\(\beta \in \mathbb{R}^{10}\) 和姿态参数\(\theta \in \mathbb{R}^{24 \times
3}\) ,我们首先通过\(\beta\) 参数来指定模版形状的变化,该参数实际上就描述了基本姿态的偏移量。具体来说,我们可以计算这些参数对不同顶点的影响\(B_S(\beta)\) ,并将其叠加到初始模板上:
\[
B_S(\beta) = \sum_{i=1}^{|\beta|}\beta_iS_i = S \beta \quad(\in
\mathbb{R}^{3N})
\]
由于不同人体形状具有较大的差异性,因此我们需要根据形状变化后的mesh来估计出符合该Mesh的骨骼点,以便于我们后续对这些骨骼点进行旋转,形成我们最终期望的姿态。我们通过骨骼点位置估计来根据形状变化后,并且处于Rest
Pose下Mesh的顶点位置,来估计出控制点的理想位置,实际上就是通过回归矩阵\(J\) 进行计算: \[
J_{S,\bar{T}, J}(\beta) = J \cdot(\bar{T}+B_S(\beta)) \quad(\in
\mathbb{R}^{3\times K})
\] 接下来我们需要通过姿态参数\(\theta\) 对其进行Mesh修正。我们首先通过Rodrigues公式将轴角表达式转化为\(3\times3=9\) 的旋转矩阵,然后同样计算姿态参数\(\theta\) 对不同顶点的影响\(B_P(\theta)\) ,其中\(\theta^*\) 表示Rest Pose下的轴角表达式:
\[
B_P(\theta) = \sum_{i=1}^{9K} (R_i(\theta)-R_i(\theta^*))P_i =
P_{(3N\times 9K)}[R(\theta) - R(\theta^*)]_{(3\times 3\times K)} \quad
(\in \mathbb{R}^{3N})
\]
完成上面的计算之后之后,我们通过叠加这些影响得到微调后的人体Mesh: \[
T_P(\beta, \theta) = \bar{T} + B_S(\beta) + B_P(\theta)
\] 同时我们还得到了经过骨骼点估计之后的控制点位置\(J_{S,\bar{T}, J}(\beta)\) 。
【注意】这里的两个步骤都是对Rest
Pose下的Mesh进行微调,经过这个计算之后,人体的Mesh仍然处于Rest
Pose下。
第一步基于形状参数对Mesh修正较好理解;
第二步根据Target Pose修正Mesh,它考虑到的是人体从Rest
Pose转化到Target
Pose后,某些局部区域也可能被影响,例如被挤压或者被拉伸等,因此在这里提前对Mesh进行微调。因为在后面真正进行Pose转换的时候,不会再对Mesh的形状进行自适应调整,而只会调整关键点的位置。
经过上面的步骤,我们已经将人体Mesh的形状调整好了,接下来就需要将它转化到Target
Pose。在这个过程中称为蒙皮(Skinning) 。我们通过\(\theta\) 描述人体骨骼点的运动,而由顶点(vertex)组成的“皮肤”也会随着骨骼点的运动而变化,该过程可以认为是皮肤顶点随着骨骼点的变化而产生的加权线性组合。
具体来说,我们首先需要计算骨骼点的旋转矩阵,姿势参数\(\theta\) 描述的是每个骨骼点在自身坐标系下的旋转,因为需要计算局部变换和它父节点的变换,最终得到每个关节的全局变换。这个过程会用到重新计算的控制点位置\(J(\beta)\) ,以及姿势参数\(\theta\) 。然后我们需要计算Mesh的其他顶点如何旋转,对于每个顶点,它最终的变换是通过对24个全局变换加权得到的,使用的权重矩阵就是之前提到的\(\mathcal{W}\) 。
完成相关计算之后,得到最终的Mesh表达\(W(T_P(\beta, \theta), J(\theta), \theta,
\mathcal{W}) \in \mathbb{R}^{3N}\) 。
其他模型
在SMPL模型之后,还有该系列的模型对其进行改进,包括:
MANO :对手进行建模,额外增加姿态参数SMPL+H :在SMPL上加入对手的建模,即SMPL+Hand(MANO)SMPL-X :在SMPL上加入对手和脸的建模
使用方式
上面我们介绍了SMPL模型的基本原理和相关系列模型,下面我们介绍具体应该如何使用它们。
SMPL官方代码项目地址为:https://github.com/vchoutas/smplx,其中提供了对上述系列模型的支持。
我们按照ECON 所提供的数据下载脚本来对原始下载内容进行组织,其中不仅包含了对原始下载内容的组织,也包括了ECON提供的一些其他数据:
1
2
3
4
5
6
7
8
9
10
11
12
13
14
15
16
17
18
19
20
21
22
23
24
25
26
27
28
29
smpl_related
SMPL以及其他模型参数
形状参数和姿态参数
SMPL参数中包括形状参数\(\beta \in
\mathbb{R}^{10}\) 和姿态参数\(\theta \in
\mathbb{R}^{24 \times 3}\) 。
其中,对于10个形态参数,有:
0
代表整个人体的胖瘦和大小,初始为0的情况下,正数变瘦小,负数变大胖(±5)
1 侧面压缩拉伸,正数压缩
2 正数变胖大
3 负数肚子变大很多,人体缩小
4 代表
chest、hip、abdomen的大小,初始为0的情况下,正数变大,负数变小(±5)
5 负数表示大肚子+整体变瘦
6 正数表示肚子变得特别大的情况下,其他部位非常瘦小
7 正数表示身体被纵向挤压
8 正数表示横向表胖
9 正数表示肩膀变宽
在smplx/smplx/joint_names.py 中记录了相关关键点对应的实际人体位置。
ModelOutput
在smplx/smplx/utils.py 中记录了相关模型的Output,后续会使用到,这里进行相关注释:
1
2
3
4
5
6
7
8
9
10
11
12
13
14
15
16
17
18
19
20
21
22
23
24
25
26
27
28
29
30
31
32
33
34
35
36
37
38
@dataclass class ModelOutput :Optional [Tensor] = None Optional [Tensor] = None Optional [Tensor] = None Optional [Tensor] = None Optional [Tensor] = None Optional [Tensor] = None @dataclass class SMPLOutput (ModelOutput ):Optional [Tensor] = None Optional [Tensor] = None @dataclass class SMPLHOutput (SMPLOutput ):Optional [Tensor] = None Optional [Tensor] = None Optional [Tensor] = None @dataclass class SMPLXOutput (SMPLHOutput ):Optional [Tensor] = None Optional [Tensor] = None @dataclass class MANOOutput (ModelOutput ):Optional [Tensor] = None Optional [Tensor] = None @dataclass class FLAMEOutput (ModelOutput ):Optional [Tensor] = None Optional [Tensor] = None Optional [Tensor] = None Optional [Tensor] = None
Mesh+Pose转换
以SIMP-X模型为例,接下来介绍如何根据不同的形状/姿态参数导出Mesh。注意已经组织好了smpl_related的文件形式:
1
2
3
4
5
6
7
8
9
10
11
12
13
14
15
16
17
18
19
20
21
22
23
24
25
26
27
28
29
30
31
32
33
34
35
36
37
38
39
40
41
42
43
44
45
46
47
48
49
50
51
52
53
54
import smplximport torch'smpl_related/models' ,'smplx' ,'neutral' ,1 , model.num_betas], dtype=torch.float32)1 , model.num_expression_coeffs], dtype=torch.float32)print (betas.shape, expression.shape)True , True )for key, value in output.__dict__.items():if value is not None :print (f"{key} : {value.shape} " )import open3d as o3d0.3 , 0.3 , 0.3 ])'smplx_mesh.ply' , mesh)
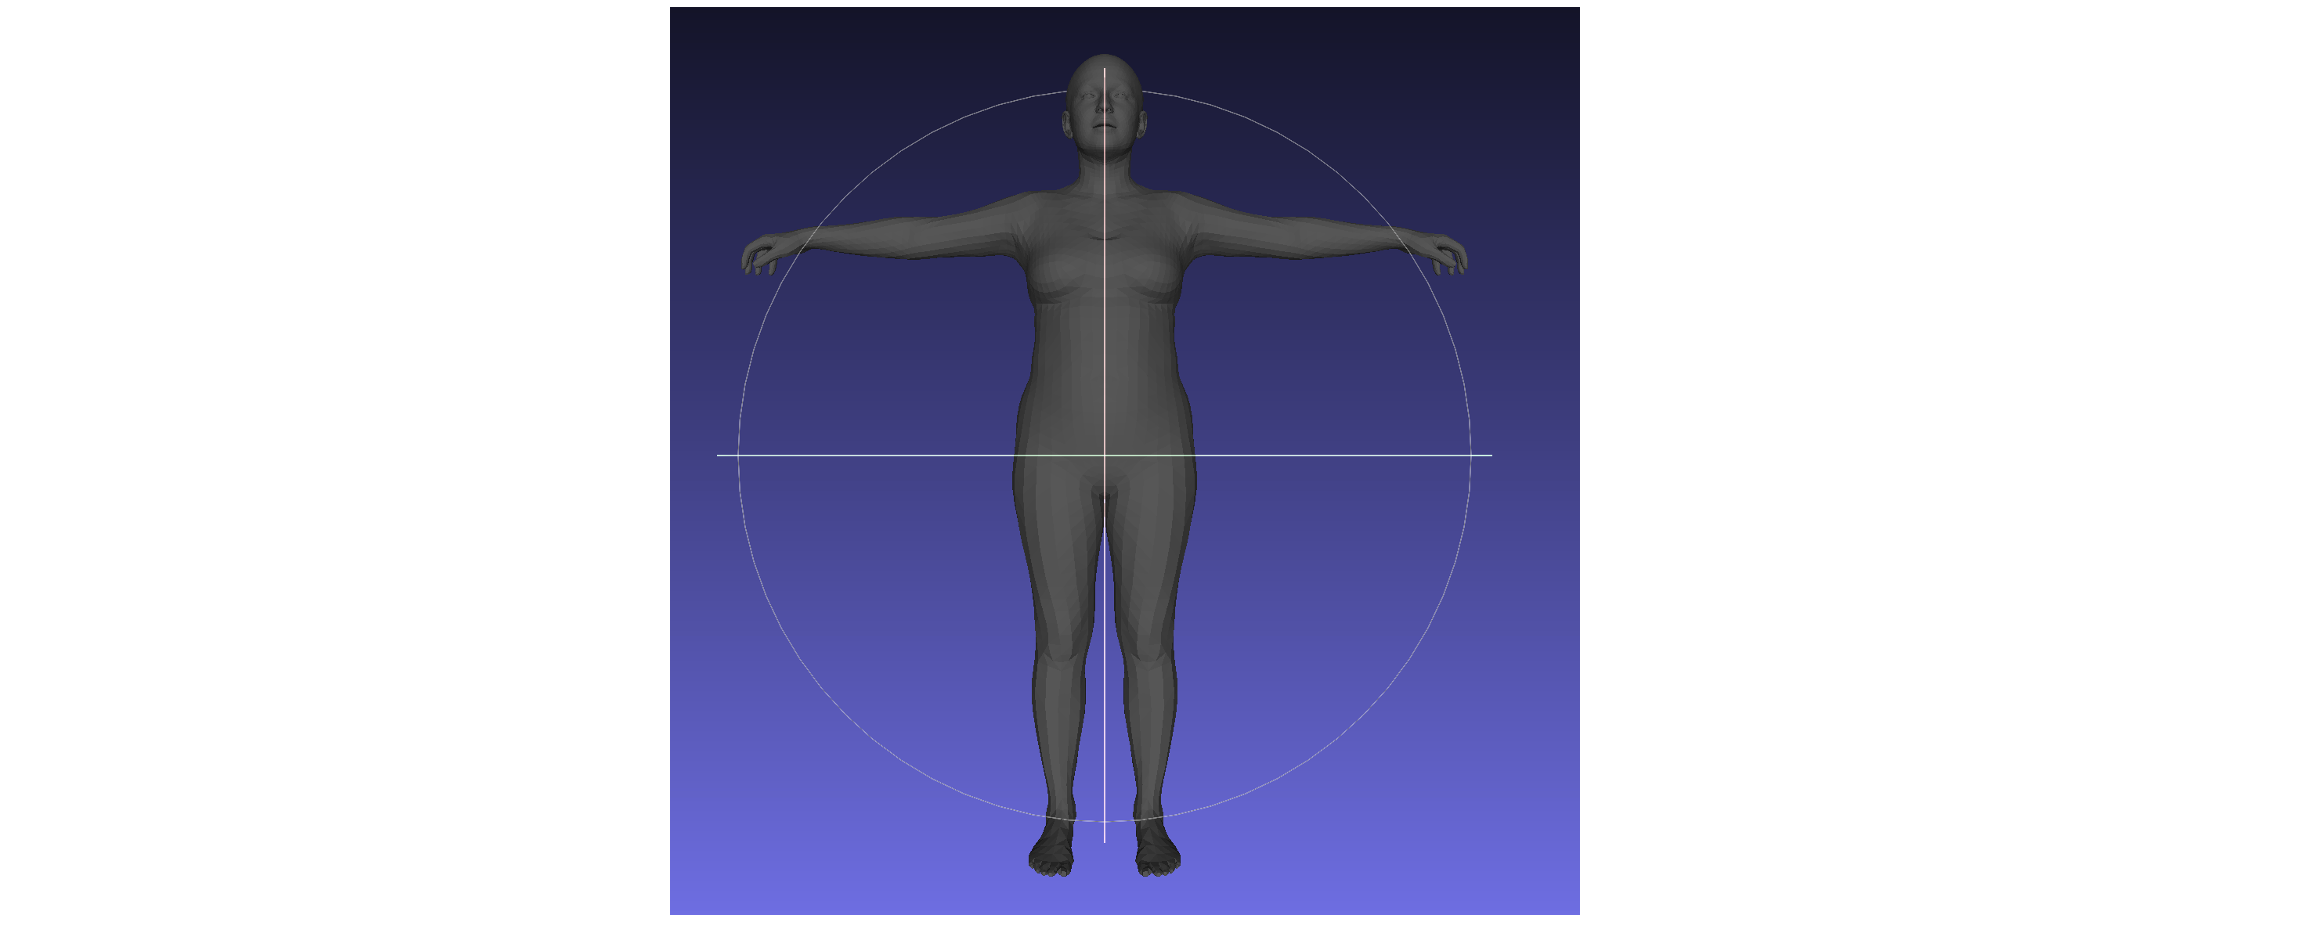
打开得到的Mesh文件,我们可以看到如下内容:
可以看到,我们得到了一个Rest
Pose的Mesh。接下来,我们来进行人体姿态的转换。
1
2
3
4
5
6
7
8
9
10
11
12
13
14
15
16
17
18
19
20
21
22
23
24
25
26
27
28
29
30
31
32
33
34
35
36
37
38
39
40
41
42
43
44
45
46
47
48
49
50
import smplximport torch'smpl_related/models' ,'smplx' ,'neutral' ,1 , model.body_pose.shape[1 ]], dtype=torch.float32) 1 , model.left_hand_pose.shape[1 ]], dtype=torch.float32) 1 , model.right_hand_pose.shape[1 ]], dtype=torch.float32) 1 , model.jaw_pose.shape[1 ]], dtype=torch.float32) 1 , model.leye_pose.shape[1 ]], dtype=torch.float32) 1 , model.reye_pose.shape[1 ]], dtype=torch.float32) True , True )import open3d as o3ddef save_mesh (file_path, vertices, faces, colors=None ):if colors is not None :else :0.3 , 0.3 , 0.3 ])'smplx_mesh.ply' , vertices, model.faces)'smplx_v_shaped_mesh.ply' , v_shaped_vertices, model.faces)
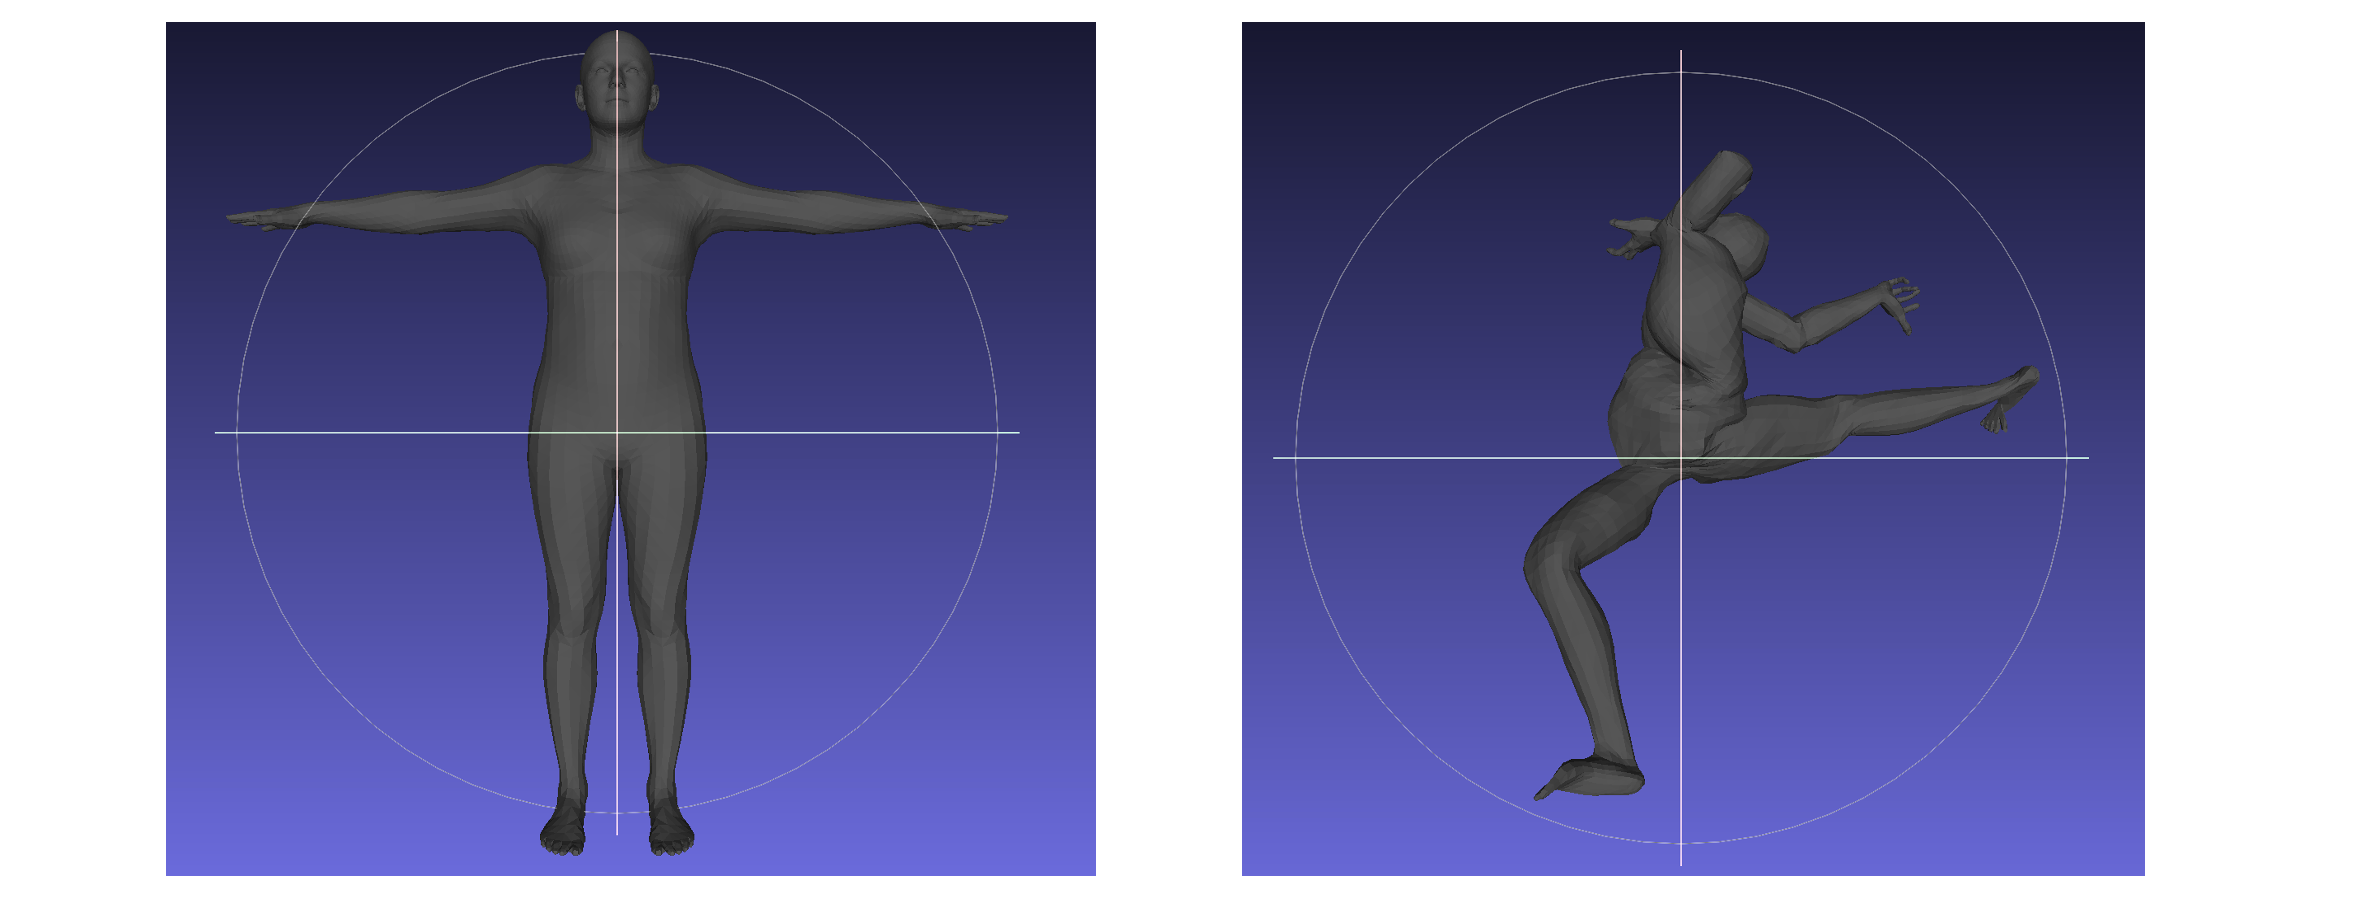
分别打开保存的两个Mesh,可以看到如下的内容,v_shaped_vertices中保存是经过形状参数调整后的Mesh,但是仍然保持RestPose;而vertices中保存的是最后同时经过形状参数和Pose转换后的Mesh(不过这里由于都是随机生成的,看起来是一个非常扭曲的状态
:(
Pose序列生成动画
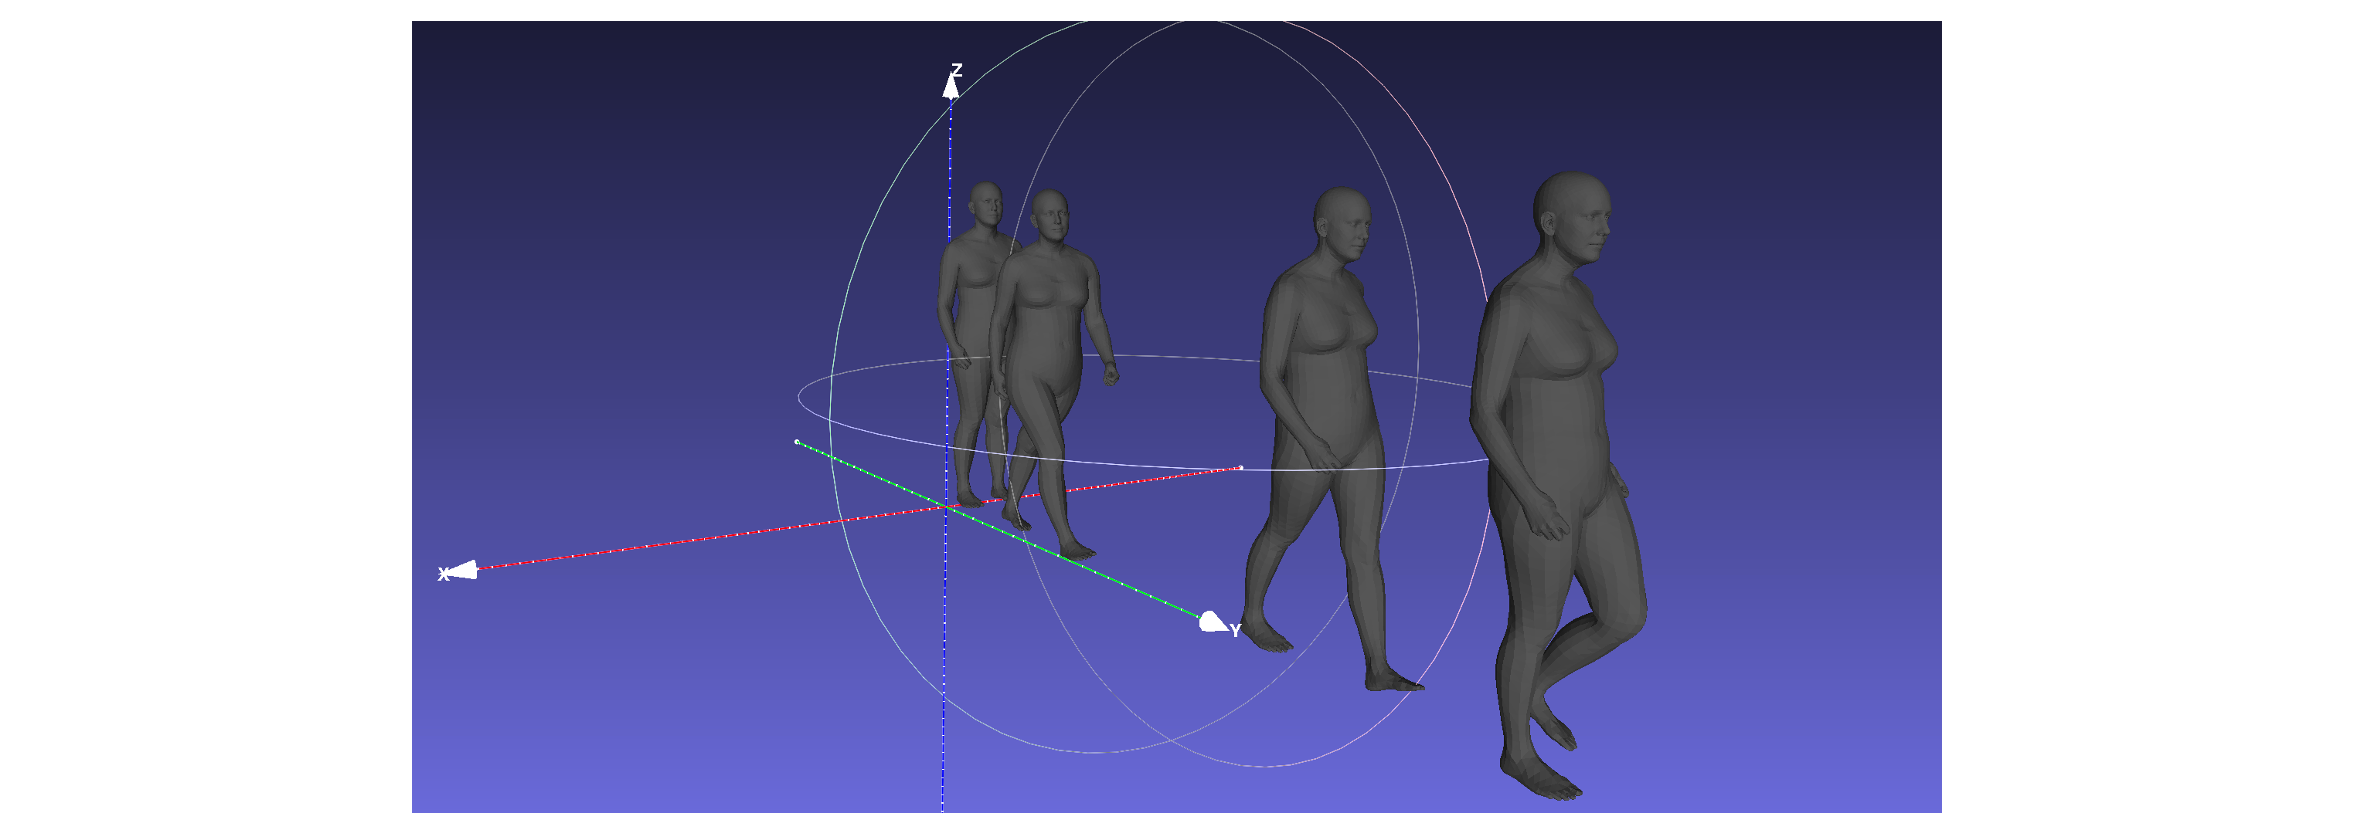
接下来我们介绍如何通过Pose序列来驱动SMPL模型,并且生成相应的动画。首先我们需要获得一段Pose序列,可以从相关预测模型中得到,我们这里在AMASS 中下载对应的Pose序列。AMASS是一个大型人体运动运动数据库。我们下载其中的ACCAD来作为测试样例。
在下面的示例中,我们选择ACCAD/Female1Walking_c3d/B1_-_stand_to_walk_stageii.npz作为测试序列,它表征了一个人从站立到行走的过程。下面是示例代码:
1
2
3
4
5
6
7
8
9
10
11
12
13
14
15
16
17
18
19
20
21
22
23
24
25
26
27
28
29
30
31
32
33
34
import smplximport torchimport open3d as o3dimport numpy as np'smpl_related/models' ,'smplx' ,'neutral' ,False 'test_pose/ACCAD/Female1Walking_c3d/B1_-_stand_to_walk_stageii.npz' True )for key, value in smplx_pose_seq.items():print (f"{key} : {value.shape} " )
可以看到在pose序列中,记录了SMPLX模型的相关参数,这些参数基本上都与model.forward()方法相关。注意这里在初始化模型的时候需要设置use_pcd=False,这是因为pose中提供了完整的hand
pose,无需使用pca进行维度对齐。
之后,我们调用model的forward方法来进行Mesh转换:
1
2
3
4
5
6
7
8
9
10
11
12
13
14
15
16
17
18
19
20
21
22
23
24
25
26
27
28
29
30
31
32
33
34
35
36
37
38
39
40
41
42
43
44
seq_len = smplx_pose_seq['pose_body' ].shape[0 ]'trans' ], dtype=torch.float32)'betas' ], dtype=torch.float32).repeat(seq_len, 1 )1 ]], dtype=torch.float32)'root_orient' ], dtype=torch.float32)'pose_body' ], dtype=torch.float32)'pose_hand' ][:, :45 ], dtype=torch.float32)'pose_hand' ][:, 45 :], dtype=torch.float32)'pose_jaw' ], dtype=torch.float32)'pose_eye' ][:, :3 ], dtype=torch.float32)'pose_eye' ][:, 3 :], dtype=torch.float32)True ,True ,for key, value in output.__dict__.items():if value is not None :print (f"{key} : {value.shape} " )
完成推理之后,我们可以取出里面每一帧对应的Mesh进行保存,保存方式与上面基本相同。
1
2
3
4
5
6
7
8
9
10
11
12
13
14
def save_mesh (file_path, vertices, faces, colors=None ):if colors is not None :else :0.3 , 0.3 , 0.3 ])'smplx_mesh_0.ply' , vertices[0 ], model.faces)
我们分别保存索引在100,300,550,700上的Mesh并在同一个场景中可视化,可以得到如下的效果:
由于我们已经获得了整个序列中所有Mesh的姿态,因此我们也可以通过代码来将整个运动可视化。这里使用Open3D来完成整个运动的可视化。下面是一个可视化的工具函数,它利用Open3D的Render,每次更新其中的Mesh并进行图像的渲染,最终组合成一个视频。
1
2
3
4
5
6
7
8
9
10
11
12
13
14
15
16
17
18
19
20
21
22
23
24
25
26
27
28
29
30
31
32
33
34
35
36
37
38
39
40
41
42
43
44
45
46
47
48
49
50
51
52
53
54
55
56
57
58
59
60
61
62
63
64
65
66
67
68
69
70
71
72
73
74
75
76
77
78
79
80
81
82
83
84
85
86
87
88
89
90
import cv2import open3d as o3dfrom tqdm import tqdmdef visualize_mesh_sequence_o3d (vertices_seq, faces, output_path, fps=60 , colors=None ):800 , 600 )1 , 1 , 1 , 1 ]) if colors is not None :False )'defaultUnlit' if colors is not None :else :0.3 , 0.3 , 0.3 ])'mp4v' )800 , 600 ))try :min (all_vertices, axis=0 )max (all_vertices, axis=0 )2 print ("场景信息:" )print (f"中心点: {center} " )print (f"范围: {extent} " )1.0 4 6 3 , 1 )3 , 1 )0 , 0 , 1 ], dtype=np.float32).reshape(3 , 1 )0 , 0 , 1 ]45. , 0.1 ,100 for vertices in tqdm(vertices_seq, desc="渲染帧" ):"mesh" , mesh, mat)except Exception as e:print (f"渲染错误: {str (e)} " )finally :print ("\n视频保存完成!" )
在默认情况下,Open3D的Render存在near和far的平面切除,在范围之外的区域则直接消失。因此这里在设置相机set_camera的时候,指定了较大的far_clip,防止某段运动序列消失
Open3D Render渲染Mesh的原始颜色,可以参考issue
利用上面得到的顶点序列和渲染工具函数,我们可以完成动作的渲染:
1
2
3
4
5
vertices = output.vertices.detach().cpu().numpy().squeeze()for i in range (vertices.shape[0 ])]'smplx_mesh_seq.mp4' )
最终的效果如下:
Textured Mesh的驱动
上面我们利用Pose序列来驱动了SMPL-X模型,但是这仍然是一个裸体的模型。考虑我们现在有一个方法,它可以从SMPLX模型出发,通过图像作为监督逐步进行Mesh的细化,最终可以得到一个包含纹理Texture的Mesh。接下来我们希望做的就是能够通过Pose序列来驱动这个Textured
Mesh。因为经过细化后的Mesh会比原始的SMPL-X模型多出更多的顶点vertices和面face,所以这里的关键就在于如何通过Pose来转换这类非标准的Mesh。
以下驱动代码参考YuliangXiu/ECON 中的实现,感谢他们优秀的工作🙏。
驱动Textured Mesh的步骤大致可以分为两个步骤,第一个是将Textured
Mesh和SMPL模型进行绑定,在Textured
Mesh中找到对应的关节点;第二个步骤就是根据动作序列进行操作。接下来就会逐步介绍相关步骤。
旋转矩阵支持
首先我们的Textured
Mesh是从SMPLX模型得到的。一般来说,我们会从图像中预测一个初步的SMPLX模型,然后逐步细化其中的Mesh。因此,我们首先可以得到这个初始SMPLX模型的参数smplx_pose_param,它其中应该包含执行forward模型所需的相关参数,例如:
1 offset, scale, body_pose, global_orient, global_trans, betas, expression, jaw_pose, left_hand_pose, right_hand_pose
关于Textured Mesh以及SMPL-X模型的获取,可以参考工作pengHTYX/PSHuman 。其中smplx_pose_param的获取可以在该项目的reconstrut.py#L317 之后进行,参考代码如下:
1 2 3 4 5 6 7 8 9 10 11 12 13 14 'offset' : offset.cpu().numpy(),'scale' : scale.cpu().numpy(),'body_pose' : optimed_pose_mat.detach().cpu().numpy(),'global_orient' : optimed_orient_mat.detach().cpu().numpy(),'global_trans' : optimed_trans.detach().cpu().numpy(),'betas' : optimed_betas.detach().cpu().numpy(),'expression' : pose['exp' ].detach().cpu().numpy(),'jaw_pose' : pose['jaw_pose' ].detach().cpu().numpy(),'left_hand_pose' : optimed_lhand.detach().cpu().numpy(),'right_hand_pose' : optimed_rhand.detach().cpu().numpy(), f'{case_path} /{case } _smpl_params.npz' , **smpl_params)
在保存SMPLX相关参数的时候,需要注意参数的维度,旋转相关的参数可能是通过轴角表达式来存储的,也有可能是通过旋转矩阵的方式来存储的。在smplx.forward()中提供了pose2rot参数来控制具体是否需要转换。在原始的smplx模型中对pose2rot的处理仍然存在一些问题,无法直接支持旋转矩阵的传入,这里主要需要在维度上进行对齐(以下修改对应原始的SMPLX实现):
1
2
3
4
5
6
7
8
9
10
11
12
13
14
15
16
17
18
19
20
21
22
23
24
25
26
27
28
29
30
if pose2rot:1 , 1 , 3 ),1 , self.NUM_BODY_JOINTS, 3 ),1 , 1 , 3 ),1 , 1 , 3 ),1 , 1 , 3 ),1 , 15 , 3 ),1 , 15 , 3 )],1 ).reshape(-1 , 165 )else :1 , 1 , 9 ),1 , self.NUM_BODY_JOINTS, 9 ),1 , 1 , 9 ),1 , 1 , 9 ),1 , 1 , 9 ),1 , 15 , 9 ),1 , 15 , 9 )],1 ).reshape(-1 , 55 , 9 )if pose2rot:else :1 , 3 )).reshape(-1 , 55 , 9 )1 , 55 , 3 , 3 )1 , 55 , 3 , 3 )'bijk,bikl->bijl' , rot_mean_matrix, full_mean_matrix)1 , 55 , 9 )
这里以SMPLX模型作为示例,对于其他模型,在维度上可能有所改变
注意轴角表达式和旋转矩阵之间相互计算存在不同,轴角表达式的叠加可以使用加法,旋转矩阵的叠加则需要使用矩阵乘法
注意各个参数的维度都需要与原始实现对齐。
在smplx.body_models.py文件中,每个模型中都定义了骨骼点的个数NUM_JOINTS。
在SMPL模型中记录的NUM_JOINTS=23,和我们上面提到的24有所不同,其他模型SMPL+H,SMPL-X也类似的情况。这是在代码实现中的处理,因为最中心的关键点保持不动。在后续提到相关数据的时候,需要按照实际意义来理解,不过基本上都表达关键点(骨骼点)的含义。
不同的Pose支持
为了在Textured
Mesh中找到对应的关节点,我们首先需要将它们进行对齐。Textured
Mesh的姿势可能有很多,我们需要在一个比较标准的pose下进行对齐。所以接下来我们继续增强原始smplx实现,使它分别支持T-pose、A-pose、DA-pose和原始pose。
T-pose:双臂水平展开,呈"T"字形,这是3D模型最标准的绑定姿势,也就是SMPLX模型在进行姿态变换前的标准姿势,通常用于骨骼绑定和权重绘制
A-pose:双臂略微向下倾斜,呈"A"字形,比T-pose更自然,但仍是标准姿势,常用于动画和游戏角色
DA-pose:双臂略微向下倾斜,双腿略微向外张开,整体成"大"字行。是A-pose的一个变体专门为SMPL/SMPL-X模型设计的标准姿势,用于更好的模型对齐和形状捕捉
我们在原始官方的实现中增加pose_type的支持,对于不同的pose类型,我们只需要修改full_pose的组成即可:
1
2
3
4
5
6
7
8
9
10
11
12
13
14
15
16
17
18
19
20
21
22
23
24
25
26
27
28
29
30
31
32
33
34
35
36
37
38
39
40
41
42
43
44
45
46
47
48
49
50
51
52
53
54
55
56
57
58
59
60
61
62
63
64
65
66
67
68
69
70
71
72
73
74
75
76
77
78
79
80
81
82
83
84
def forward (..., pose_type: str = 'pose' , ... ) -> SMPLXOutput:if pose2rot:else :1 , 3 )).reshape(-1 , 55 , 9 )1 , 55 , 3 , 3 )1 , 55 , 3 , 3 )'bijk,bikl->bijl' , rot_mean_matrix, full_mean_matrix)1 , 55 , 9 )def create_identity_matrix_torch (batch_dims, matrix_size=3 ):if isinstance (batch_dims, int ):return identitydef build_full_pose (body_pose, global_orient, jaw_pose, leye_pose, reye_pose, left_hand_pose, right_hand_pose, pose2rot ):if pose2rot:0. ,0. ,0. ,0. ,0. ,1 ,else :1 , 3 ))1 , 1 , 9 ),1 , self.NUM_BODY_JOINTS, 9 ),0 ], jaw_pose.shape[1 ]),3 1 , 1 , 9 ),0 ], leye_pose.shape[1 ]),3 1 , 1 , 9 ),0 ], reye_pose.shape[1 ]),3 1 , 1 , 9 ),0 ], left_hand_pose.shape[1 ]),3 1 , 15 , 9 ),0 ], right_hand_pose.shape[1 ]),3 1 , 15 , 9 ),1 ,1 , 55 , 9 )return full_poseif pose_type == "t-pose" :0 ], self.NUM_BODY_JOINTS, 3 )0 ], -1 )elif pose_type == "a-pose" :0 ], self.NUM_BODY_JOINTS, 3 )15 ] = torch.tensor([0. , 0. , -45 * np.pi / 180. ])16 ] = torch.tensor([0. , 0. , 45 * np.pi / 180. ])0 ], -1 )elif pose_type == "da-pose" :0 ], self.NUM_BODY_JOINTS, 3 )0 ] = torch.tensor([0. , 0. , 30 * np.pi / 180. ])1 ] = torch.tensor([0. , 0. , -30 * np.pi / 180. ])0 ], -1 )max (betas.shape[0 ], global_orient.shape[0 ],0 ])
此处仍然需要注意轴角表达式和旋转矩阵的使用,关键在于batch_rodrigues函数的使用,它的实现在官方的utils 中
这里我们还实现了一个工具函数create_identity_matrix_torch,它可以生成指定batch维度的单位矩阵
这里我们保持全局旋转global_orient不变
在ECON中还增加了两个开关,分别用于返回关节点joint的转换和顶点vertex的转换,注意这里只是一个示例,并没有涉及到所有的改动,例如SMPLXOutput、lbs等相关代码也需要修改:
1
2
3
4
5
6
7
8
9
10
11
12
13
14
15
16
17
18
19
20
21
22
23
24
25
26
27
28
29
30
31
32
33
34
35
36
37
38
39
40
41
42
43
44
45
def forward (..., return_joint_transformation: bool =False , return_vertex_transformation: bool =False , ... ):1 )if return_joint_transformation or return_vertex_transformation:True ,else :if return_verts else None ,if return_full_pose else None ,if return_joint_transformation else None ,if return_vertex_transformation else None ,)
以上我们主要是对smplx的原始实现进行了增强,使它可以支持旋转矩阵,也可以支持不同pose下的的姿态。利用现有条件,我们可以获取不同pose下的SMPLX模型。
1
2
3
4
5
6
7
8
9
10
11
12
13
14
15
16
17
18
19
20
21
22
23
24
25
26
27
28
29
30
31
32
33
34
35
36
37
38
39
40
41
42
43
44
45
46
47
48
49
50
51
52
53
54
55
56
57
58
59
60
61
62
63
64
import trimeshimport smplximport torchimport numpy as npdef create_identity_matrix_torch (batch_dims, matrix_size=3 ):if isinstance (batch_dims, int ):return identity'smpl_related/models' ,'smplx' ,'neutral' ,False '...' True )'betas' ][:, :model.num_betas], dtype=torch.float32).reshape(1 , -1 )'global_orient' ], dtype=torch.float32).reshape(1 , 9 )'body_pose' ], dtype=torch.float32).reshape(1 , -1 )'left_hand_pose' ], dtype=torch.float32).reshape(1 , -1 , 9 )'right_hand_pose' ], dtype=torch.float32).reshape(1 , -1 , 9 )'global_trans' ], dtype=torch.float32).reshape(1 , -1 )'expression' ][:, :model.num_expression_coeffs], dtype=torch.float32).reshape(1 , -1 )'jaw_pose' ], dtype=torch.float32).reshape(1 , -1 , 9 )1 , 1 , 9 ], dtype=torch.float32)1 , 1 , 9 ], dtype=torch.float32)0 ], 3 ).reshape(1 , 9 )dict ()for pose_type in ["a-pose" , "t-pose" , "da-pose" , "pose" ]:True ,True ,True ,True ,False ,for pose_type, output in smpl_out_dict.items():True ,False f'smplx_mesh_{pose_type} .ply' )
如果将其保存成Mesh之后同时可视化,可以得到如下的结果:
joint对齐和绑定
接下来我们需要得到在Texturd Mesh中的关节点信息,这要求我们将Textured
Mesh对齐到SMPLX模型下。
首先我们需要处理Textured
Mesh,使其大致与SMPLX模型能够对齐。因为在一些方法中,可能会对Textured
Mesh作一些处理,包括移动和缩放等,我们需要将这些操作反向执行。这一步与特定的方法相关,下面是可能的流程,这里就不再展开。
1 2 3 4 5 6 7 8 9 10 '...' )2 / smplx_pose_param['scale' ] - smplx_pose_param['offset' ]1.0 , -1.0 , -1.0 ]) 'global_trans' ]'textuded_mesh_aligned.ply' )
总之,经过上面的步骤之后,我们可以得到一个大致与SMPLX对齐的Textured
Mesh,但是pose仍然保持原样。而在上面我们也获得了一个与该Mesh
pose相同的SMPLX模型,因此我们可以通过距离来找到Textured
Mesh顶点与SMPLX顶点之间的对应关系:
1
2
3
4
5
6
from scipy.spatial import cKDTree'pose' ].vertices.detach()[0 ]3 )
然后利用在转换过程中得到的旋转矩阵,我们可以将Textured
Mesh转化成不同的Pose:
1
2
3
4
5
6
7
8
9
10
11
12
13
14
textured_vertices = torch.tensor(textured_vertices).float ()'pose' ].vertex_transformation.detach()[0 ][idx[:, 0 ]] 1 ]1 ).unsqueeze(-1 )3 , 0 ].cpu()True , process=False )'da-pose' ].vertex_transformation.detach()[0 ][idx[:, 0 ]]1 ).unsqueeze(-1 )3 , 0 ].cpu()True , process=False )
同时由于我们计算出了Textured
Mesh与SMPLX模型顶点的之间的对应关系,据此可以计算出相应的J_regressor,lbs_weights,posedirs
在ECON中选择在DA-pose下进行计算对应关系。如果DA-pose的Textured
Mesh比较准确是确实可以这样做的。不过我们这里选择直接在原始pose下进行关键点的对应,因为在过程中查看发现DA-pose的Textured
Mesh已经具有较大的撕裂和形变,并不准确。
选择在哪个pose下进行对应关系计算需要有所取舍,我们可以在过程中进行可视化,如果DA-pose下Textured
Mesh和SMPL-X
Mesh比较贴合,那么优先在该Pose下对应。如果已经有较大的差距,那么选择在更贴合的原始Pose下进行对应。
1
2
3
4
5
6
7
8
9
10
11
12
13
14
15
16
17
18
19
20
21
22
23
24
25
26
smpl_vertices = smpl_out_dict['pose' ].vertices.detach()[0 ]3 ) 2 ))sum (axis=1 , keepdims=True )None ]).sum (dim=-1 )None ]).sum (dim=-1 ).T0 ]1 , 3 )[:, idx, :] * knn_weights[None , ..., None ]sum (dim=-2 ).view(num_posedirs, -1 ).float ())sum (dim=1 , keepdims=True ).clip(min =1e-10 )sum (dim=1 , keepdims=True )'v_template' : torch.tensor(textured_t_mesh.vertices).double().unsqueeze(0 ),'posedirs' : textured_posedirs,'J_regressor' : textured_J_regressor,'parents' : model.parents,'lbs_weights' : textured_lbs_weights,'rgb' : textured_mesh.visual.vertex_colors,'faces' : textured_mesh.faces,
上面生成的texturd_mesh_infos实际上就存储了我们进行Textured
Mesh驱动所需要的所有数据,包括关键点、蒙皮权重、pose主成分、J_regressor等等。注意这里的v_template需要的是处于T-pose下的Textured
Mesh,因为原始SMPLX中的驱动逻辑是从T-pose出发的。
Mesh驱动
此时我们已经获取了驱动Textured
Mesh所需的所有数据,接下来的核心逻辑就是进行蒙皮操作。在ECON中实现了一个general_lbs 方法,我们可以利用这个方法来进行Mesh的变化。相比官方原始的lbs方法,general_lbs删除了beta
\(\beta\) ,即忽略形状参数,只进行姿态的计算。
这里我们仍旧需要获取一个Pose序列,这里我们假设已经完成了在上一部分Pose序列生成动画的操作,我们可以得到smplx_model的输出为output。这里面的vertices存储的是SMPLX的Mesh。我们需要通过这个output来得到整体的full_pose,以进行pose计算,核心逻辑如下:
1
2
3
4
5
6
7
8
9
10
11
12
13
vertices_list = []for i in tqdm(range (seq_len)):1 , :],'v_template' ],'posedirs' ],'J_regressor' ],'parents' ],'lbs_weights' ],'trans' ][i]
然后有了这个vertices列表,我们就可以进行视频的生成,或者是Mesh的保存。
1
2
3
4
5
6
7
8
9
10
textured_mesh_face = textured_mesh_info['faces' ]'rgb' ][:, :3 ]/255.0 'smplx_mesh_seq.mp4' , 60 ,
效果如下:
通过上面的步骤,我们可以通过Pose序列来驱动Textured
Mesh。但是这里核心步骤在于Textured Mesh和SMPLX之间对应关系的计算。
最理想的情况下,是我们的Textured Mesh和T-pose的SMPLX
Mesh能够完美对齐,这样计算出来的对应关系是最精确的。而在其他Pose下,可能由于不同部位之间非常接近,导致对应关系计算错误,最终Mesh驱动的效果也不是很好。一般来说,只要我们的Textured
Mesh在T-pose下能够表现出较好的质量,后续的Pose驱动也就没有太大的问题。
参考文章
人体动作捕捉与SMPL模型
(mocap and SMPL model) | 机器学习杂货铺总店 SMPL
人体模型介绍 - 软件开发人员 --- SMPL Human Model Introduction - Software
Developer 基于SMPL的三维人体重建-SMPL模型的计算与构建(3)
- 知乎 SMPL模型学习
- sariel_sakura - 博客园
